Cauliflower Varieties
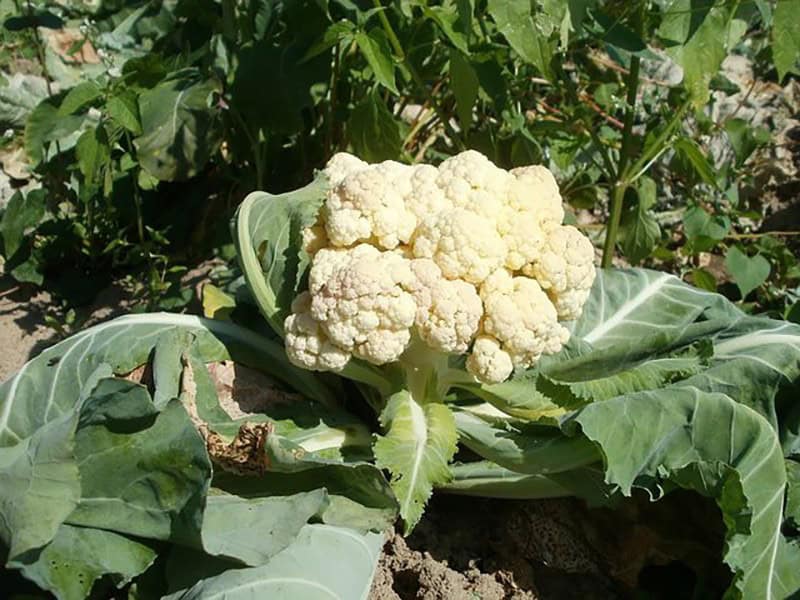
When it comes to choosing the right cauliflower variety for your climate and situation, there are many options to consider. Here’s a rundown of some of the most popular varieties: Goodman is an early producer with small, uniform heads that boast a delicious nutty flavor and tender florets. Steady is another option that can thrive in a range of climates, thanks to its natural wrapping mechanism that shields the dense white head from external damage.
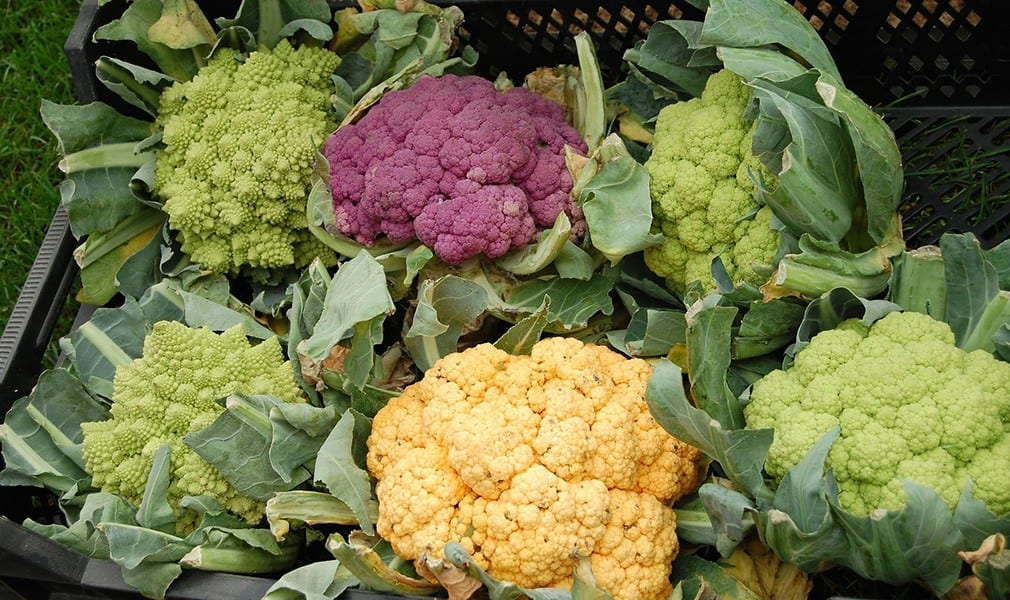
For a pop of color in your garden, try Cheddar – this orange variety is packed with beta-carotene just like carrots, and its vibrant orange florets become even more stunning when cooked. If you’re looking for an early harvest, Minuteman is ready in just 51 days, producing snow-white heads that average over 2 pounds each. Freedom is another hybrid option that does well in both cool and warm weather conditions, wrapping naturally without the need for manual intervention.
Amazing offers a low-maintenance solution for gardeners who struggle with cauliflower growth, with harvestable heads at any size and self-wrapping leaves. For those looking for a quick summer harvest, Basileo is a hybrid green variety that matures rapidly. Beginners may find Snow Crown an excellent choice due to its easy growth, rapid maturity, and disease resistance.
If you’re looking for something a bit different, try Orbit – this romanesco-type cauliflower has spiky green florets with a slightly nutty flavor, preferring cooler temperatures. Finally, Graffiti offers an intense purple head that adds an unusual touch to meals, is heat-tolerant, and matures in 70 days – just be aware that it turns blue when cooked.
Planting Cauliflower
To begin your cauliflower cultivation journey, it’s essential to establish a solid foundation. This starts with understanding the fundamental steps involved in planting and setting up your crop. In this section, we’ll delve into the process of introducing this delicious and nutritious vegetable to your garden or indoor space, laying the groundwork for future care and maintenance.
Zones
When to Plant Cauliflower
When it comes to cultivating cauliflower, the timing of planting largely depends on the specific variety you’re working with. Some types thrive in cooler temperatures and do well when planted for a fall harvest in warmer climates, as they prefer a cool-season growing period. For summer varieties, transplantation typically occurs in early spring, just before the last frost.
In my region, this coincides with soil warming up, so plan to plant seedlings indoors about 3-4 weeks prior to the last frost. Conversely, for fall harvesting, it’s essential to start indoor seedlings approximately 6-8 weeks before your first frost date, giving the cauliflower sufficient time to mature.
Sunlight and Temperature Requirements
Cauliflower’s success relies heavily on its environment. While it craves at least 6 hours of direct sunlight to grow, it thrives best in cool temperatures around 60°F. This can be a significant challenge for gardeners living in areas with scorching summers.
However, there are ways to overcome this hurdle. For those in hot climates, consider planting varieties like Snow Crown, Amazing, Cheddar, or Graffiti, which have some degree of heat tolerance.
Alternatively, you can start cauliflower indoors and then transplant it after the hottest part of summer has passed, as is often the case in the Deep South.
Soil Requirements
For optimal growth, cauliflower thrives in well-drained soil with a slightly alkaline pH range of 6.5 to 6.8. To create an ideal environment, incorporate generous amounts of organic matter into the soil, which will not only improve drainage but also provide essential nutrients for healthy plant development.
Transplanting
When it’s time to transplant your cauliflower seedlings, wait until about 2-3 weeks after the final frost of the season. It’s essential to provide them with enough space to spread out and grow, so make sure you’re planting them in beds rather than containers. This will ensure they receive the room they need to thrive.
Spacing Cauliflower
When it comes to cauliflower cultivation, adequate spacing is crucial. Without sufficient room, your plants will struggle to thrive, resulting in stunted and headless specimens. Moreover, overcrowding fosters an environment conducive to disease and pest issues. For optimal growth, square foot gardeners should aim for one plant per square foot, while row gardeners can space them 18-24 inches apart, leaving a minimum of 30 inches between rows.
Expected Germination Time
When it comes to germinating radish seeds, you can expect a process that’s remarkably similar to what you’d experience with cabbage seeds. With optimal growing conditions, sprouts are likely to emerge within roughly seven days.
Caring for Your Cauliflower Plants
Watering
To ensure optimal growth, it’s essential to maintain consistent moisture levels in the soil. Cauliflower thrives in environments with ample water supply, so avoid allowing the soil to dry out. Mulching can be an effective way to regulate soil moisture and prevent interruptions in head growth. As a general guideline, strive to provide your cauliflower plants with 1 to 1.5 inches of water per week, adjusting as needed based on weather conditions.
Temperature
When it comes to growing cauliflower, one of the biggest challenges is maintaining consistent temperature conditions. Unlike some other vegetables, cauliflower isn’t forgiving when it comes to temperature fluctuations. This means that hot summers can be particularly problematic. In fact, if the weather gets too warm, your cauliflower may experience ‘buttoning’, where it forms multiple small heads instead of a single large one. On the other hand, a deep freeze can also cause damage to the plant.
To increase your chances of success, you’ll need to try to control the growing conditions as much as possible. This means ensuring that the temperature is neither too hot nor too cold. In the spring, use row covers or cloches to protect your transplants from frost damage, and in the summer, consider using a shade cloth to prevent heat stress. By taking these precautions, you can help your cauliflower thrive and enjoy a bountiful harvest.
Fertilizing
When cultivating cauliflower, it’s essential to maintain optimal magnesium levels, as this cruciferous vegetable can be quite sensitive to these conditions. To ensure a bountiful harvest, consider side-dressing your crop with nitrogen roughly midway through the growing season, as this will help promote healthy growth and development.
Rotation
Incorporating crop rotation into your gardening strategy is essential for maintaining a healthy and thriving ecosystem. By intentionally alternating the types of crops grown in a particular area, you can significantly reduce the likelihood of pests and diseases taking hold. When it comes to brassicas like cauliflower, it’s particularly important to avoid planting them in areas where plants from the same family – such as broccoli, kale, or cabbage – have been previously cultivated.
This simple yet effective technique is a vital component of any well-rounded gardening approach.
Succession sowing
For a continuous harvest, stagger your seed starting from March to mid-summer. This approach allows you to set out transplants at regular intervals, giving you a steady supply of fresh produce throughout the growing season. Additionally, selecting varieties with different maturity dates provides even more flexibility and ensures that there’s always something new to look forward to.
Additional Tip
When cultivating certain types of cauliflower, it’s essential to blanch the head to maintain its natural whiteness. Some varieties may naturally self-shade, but others require a bit more assistance. To achieve this, simply wrap the leaves around the plant and secure them with twine. Regularly check for pests and monitor the plant’s progress by opening up the wrapping periodically, especially after heavy rainfall to allow the head to dry out.
Cauliflower Problems and Solutions
Problems
When cultivating cauliflower, several factors can impact head growth and quality. One common issue is nutrient deficiencies, which can slow down growth and result in small heads. Similarly, unstable growing conditions can also lead to undersized or irregularly shaped heads. To promote healthy growth, ensure your plants receive adequate nutrition. Temperature fluctuations can also affect cauliflower head development.
If temperatures swing wildly, the heads may not form properly, resulting in non-uniform or even absent heads. To mitigate this issue, consider using crop covers when temperature extremes occur. Another challenge is discoloration, which can occur if cauliflower heads are exposed to direct sunlight. In such cases, it’s essential to provide shade or use wraps to protect the developing heads.
If your plants are already mature and their heads are irregularly shaped, there may be little you can do to correct the issue. However, if you’re growing for personal consumption, don’t automatically discard an imperfect-looking cauliflower simply because of its appearance. Instead, wash it carefully, inspect for any pests, and enjoy it as part of your meal.
Cabbage Worms
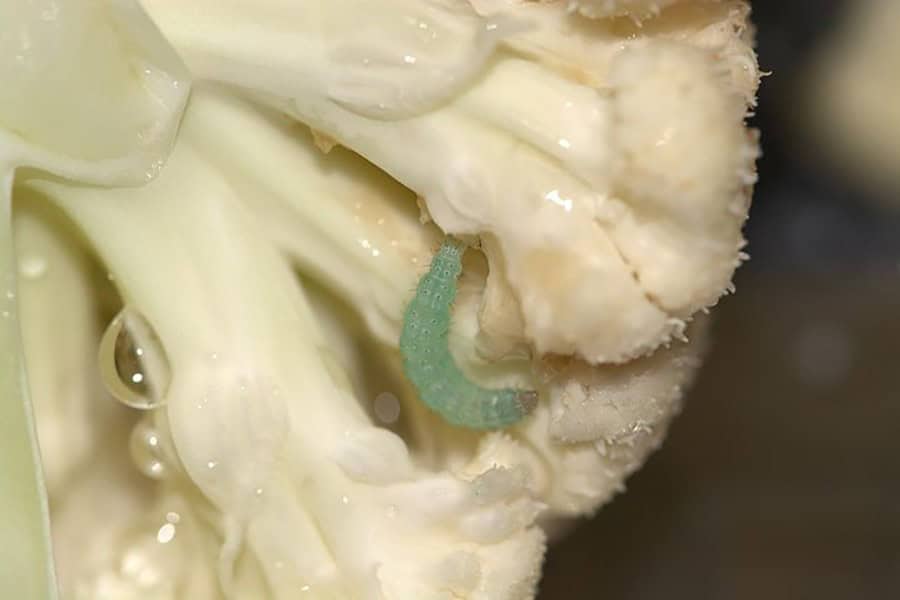
Cabbage worms are the nemesis of many gardeners, and for good reason. These pesky creatures thrive in the latter stages of the growing season, multiplying rapidly to devastating effect on cauliflower crops. Their voracious appetite leaves them munching on leaves and burrowing into heads, leaving behind unsightly droppings.
To prevent an infestation from taking hold, it’s essential to cover your growing cauliflower plants and foster a natural balance by encouraging the presence of beneficial predators such as Trichogramma wasp larvae, spiders, and yellow jackets. You can also repel them using a tansy oil mixture or plant the herb nearby.
If you do find yourself facing an infestation, prompt action is crucial. Remove any cabbage worms that make it onto your plants and dispose of them accordingly.
As a last resort, biological insecticides like Bt (Bacillus thuringiensis) or spinosad-based sprays can be used to control the population.
Finally, in the fall, be sure to remove overwintering pupae by tilling your garden, ensuring that any remaining larvae are eliminated and preventing a future infestation from taking hold.
Cabbage Root Maggots
Cabbage root maggots are a nuisance that can leave your crops looking brown and withered. These pests feed on the roots of plants belonging to the Brassica family, including cabbage, cauliflower, and broccoli. The initial signs of infestation may be subtle, making it crucial to inspect your soil for eggs and larvae. To keep these unwanted guests under control, consider using cabbage collars around plant stems and setting up sticky traps throughout your garden to capture any stray maggots.
Cabbage Aphids
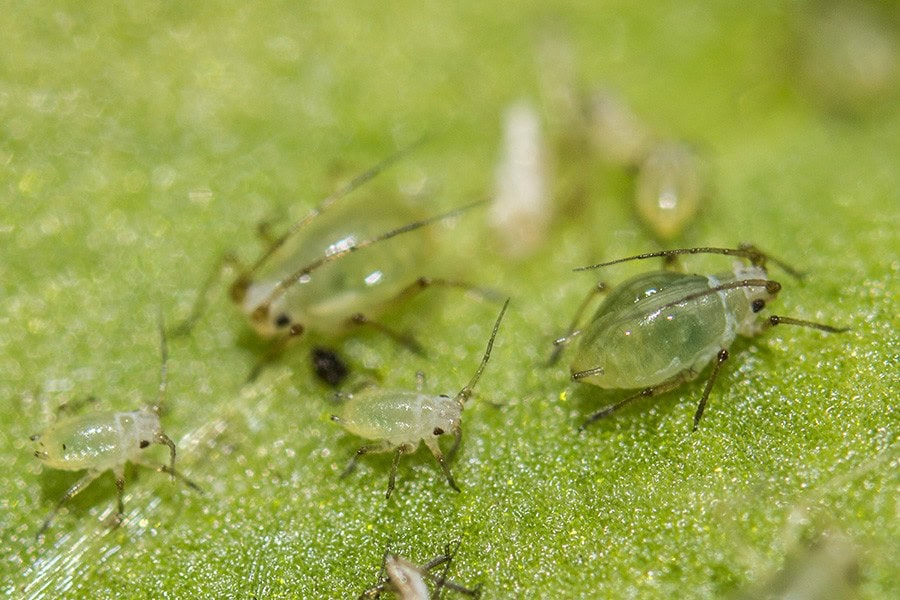
While cabbage aphids might not be as challenging to manage as some other pests, they still require attention. A simple yet effective approach is to blast them away with a strong stream of water from your hose. This non-chemical method can be particularly useful in keeping populations in check. For added protection, consider using reflective mulches to deter these pesky insects.
However, if the infestation becomes severe, you may need to take more drastic measures and turn to natural alternatives like neem or canola oil for control.
Cabbage Looper
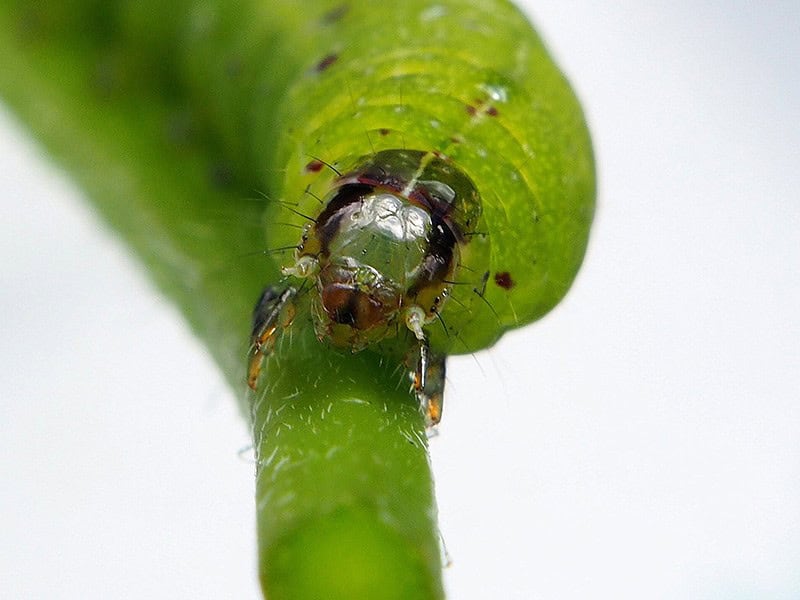
When it comes to the cabbage looper, prevention is key. These voracious pests can consume up to three times their body weight in plant matter daily, making it crucial to keep them under control. One way to identify a cabbage looper is by its unique movement pattern, where it brings its rear end forward in an inchworm-like fashion. If you spot one on a leaf, simply drown it in soapy water. For more severe infestations, consider using spinosad or BTK spray to keep them in check.
To prevent these pesky critters from taking over your garden, try using crop covers and planting attractive companion crops like parsley, dill, fennel, and coriander nearby. These plants have the added benefit of attracting natural predators that feed on cabbage loopers, providing a dual layer of protection for your prized greens.
Cauliflower Mosaic
When it comes to this particular virus, aphids are typically responsible for its spread. Unfortunately, once a plant is infected, there’s no effective treatment available. To prevent further spread, it’s essential to dispose of any affected plants and thoroughly disinfect your gardening tools. As the primary vectors of transmission are pests, maintaining a pest-free garden is crucial.
Additionally, keeping weeds at bay is also important, as they can provide shelter for these pesky critters, allowing them to continue spreading the disease.
Clubroot
The insidious clubroot fungus, a persistent inhabitant of soil, wreaks havoc on cauliflower crops by stunting their growth and causing wilting leaves. This pernicious pathogen can remain dormant in the soil for an astonishing decade or more. To effectively mitigate its impact, growers must prioritize selecting resistant varieties and implementing crop rotation strategies to prevent this disease from gaining a foothold.
Black Rot
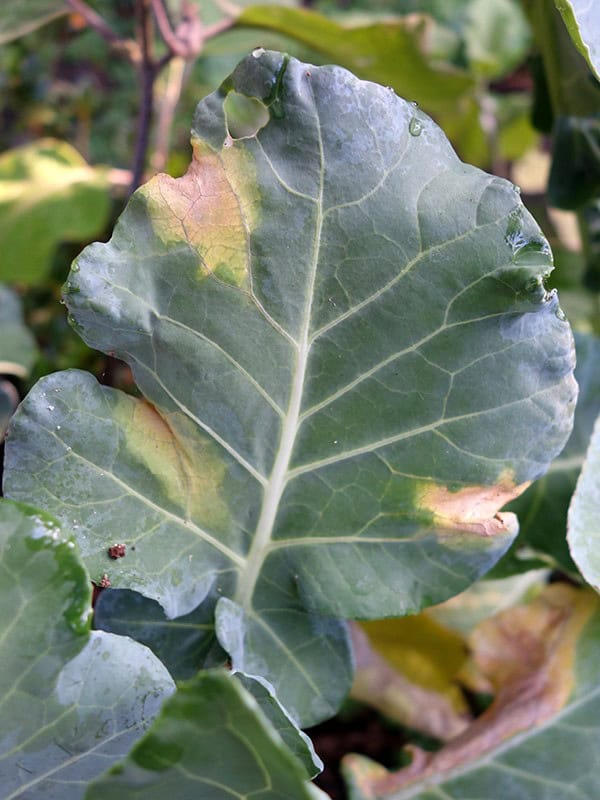
Cauliflower gardeners, beware! Black rot is another insidious disease that can wreak havoc on your prized plants. The telltale signs of infection begin as lesions on the leaves, a clear indication that something is amiss. To keep black rot at bay, make sure to practice crop rotation and sanitize your seed starting tools with care. If you’re already struggling with this pesky bacteria, consider planting resistant varieties to minimize its impact.
Bacterial Soft Rot
Cauliflower wilt is a bacterial disease that causes plants to display unsightly symptoms, including mushy, discolored spots that can ooze a slimy liquid. Unfortunately, there is no cure for this condition, so it’s crucial to remove and destroy any infected plants to prevent the spread of the disease. To minimize the risk of infection, ensure your cauliflower plants have adequate spacing to facilitate good air circulation.
This is particularly important in warm, humid environments where the bacteria that cause wilt thrive. By planting your cauliflower in raised beds with well-drained soil and providing optimal nutrient levels, you can create a healthy environment that helps your plants resist this disease.
Blackleg
Cruciferous crops are vulnerable to the fungal infection known as blackleg, which can cause significant damage by causing lesions that gradually turn black over time. This affliction is more prevalent in regions with high levels of rainfall and humidity. To mitigate the risk of blackleg, it’s essential to implement good farming practices such as controlling weeds, rotating crops regularly, and providing plants with sufficient space.
Furthermore, ensuring the quality of your seeds by using disease-free stock or treating them with hot water before planting can also go a long way in preventing the spread of this fungal infection.
Downy Mildew
When downy mildew strikes, it’s characterized by the appearance of powdery white patches on plant leaves – a telltale sign that affects even the most resilient of greens like cauliflower. To combat this fungal disease, it’s crucial to alter your watering habits. Avoid soaking your plants in the morning when the spores are at their peak release. Instead, focus on providing optimal air circulation by spacing out your crops and encouraging airflow around each plant.
Additionally, consider implementing a crop rotation strategy every year to minimize the risk of downy mildew from recurring. Finally, opt for cauliflower varieties that have natural resistance to this pesky fungal disease.
White Rust
The common fungal disease, characterized by the formation of chalky white spots on affected plant surfaces, can significantly impact the growth and appearance of your cauliflower crop. If left untreated, it may lead to deformation and other issues. To mitigate this problem, consider incorporating fall soil tilling into your routine, as well as implementing a crop rotation strategy to break disease cycles and promote healthy plant development.
Powdery Mildew
When powdery mildew infects your plants, it can start as a light dusting that resembles flour coating, but swiftly develop into a devastating crop-destroying issue. To combat this fungal menace, neem oil and other organic fungicides are effective treatments. However, prevention is always the most effective strategy. To minimize the risk of powdery mildew, avoid using overhead irrigation methods and opt for resistant cauliflower varieties instead.
At the end of each growing season, thoroughly remove any plant debris to prevent the disease from lingering and coming back. Additionally, ensure you’re rotating your crops regularly and being mindful of excessive nitrogen applications that can exacerbate the issue.
Ring Spot
The fungal pathogen known as ring spot poses a significant threat to cole crops, with its spores capable of dispersing through wind, water, or seeds. Furthermore, the fungus can persist in soil for extended periods, allowing it to overwinter and continue to affect future plantings. One of the primary indicators of ring spot infection is the appearance of dark spots on plant leaves, which can ultimately lead to a complete blackening of the entire plant.
To prevent the spread of this disease, it’s essential to implement crop rotation practices, regularly removing weeds that could harbor the fungus. Additionally, copper-based sprays have been shown to be effective in controlling ring spot infection.
Damping Off
Damping off, a common affliction affecting young plants and seedlings, can prove devastating if left unchecked. This fungal or mold-based disease has the potential to wipe out an entire crop in short order, rendering all your hard work futile. To effectively manage this menace, prevention is key. A crucial first step involves utilizing sterile soil, pots, and tools when planting seedlings.
By taking proactive measures to maintain a clean environment, you can significantly reduce the likelihood of damping off striking and minimize the risk of crop loss.
Beet Armyworm
The beet armyworm poses a significant threat to crops in southern regions, leaving behind telltale irregular holes in plant leaves that can ultimately lead to crop skeletonization. If detected early on, these caterpillars can be effectively removed and eliminated through manual removal. In more severe cases, spinosad may prove a valuable tool for eradication.
Additionally, fostering a garden ecosystem that supports natural predators can go a long way in helping to naturally regulate beet armyworm populations.
Cucumber Beetles
Cauliflower enthusiasts beware: tiny holes in the leaves of your prized plants may be more than just a cosmetic issue. It’s likely the work of cucumber beetles, notorious for their voracious appetite for seedlings and tendency to spread diseases as they feed. To keep these pesky insects at bay, employ sticky traps to ensnare them and utilize row covers to encase your tender shoots, safeguarding against future infestations.
Cutworms
When it comes to protecting cauliflowers from the ravages of cutworms, timing is crucial. Young plants are particularly vulnerable to these pests, which can quickly devour their leaves and stems. To prevent damage, ensure that your growing area is free from weeds, as these can provide shelter for the larvae. Regularly inspect your plants at night, when the larvae are most active, and hand-pick any you find.
For a more long-term solution, consider using natural deterrents like spinosad or rosemary essential oil to keep cutworms away. Additionally, sprinkle diatomaceous earth around the base of your plants to further discourage these pests from feasting on your cauliflowers.
White Mold
When diagnosing the issue, pay attention to the presence of irregular white-gray lesions on leaves and stems, which is a characteristic symptom of Sclerotinia stem rot. To prevent this disease from spreading, implement proper crop rotation strategies, maintain control over weed populations, and ensure plants have sufficient space during planting. Additionally, promptly remove and destroy any infected plants to minimize further damage.
Diamondback Moth
When it comes to diamondback moths, it’s essential to understand their formidable reputation. These pests are notorious for their resilience to insecticides, impressive reproduction rates, and the fact that they have a relatively limited number of natural predators. To combat this issue effectively, consider utilizing trap crops like mustard and collards to help regulate populations.
Additionally, incorporating crop rotation strategies specifically designed for brassicas is crucial in minimizing the impact of diamondback moths on your garden.
Flea Beetles
These minuscule beetles are known for their unique feeding habits, targeting plant leaves as adults and roots as larvae. One common indication of infestation is the presence of small holes in leaves, which while not fatal to the plant itself, can facilitate the spread of bacteria that can be detrimental. To effectively manage these pests, a simple yet effective solution involves mixing four parts water with two parts rubbing alcohol and one part dish soap.
Additionally, dusting plants with talcum powder or using sticky traps can also prove useful in controlling their populations. Furthermore, maintaining a generous layer of mulch around your plants can help prevent beetle larvae from reaching the plant in the first place.
Root-Knot Nematode
Cauliflower farmers beware: a pesky nematode is lurking beneath the surface. If left unchecked, it can cripple your crop’s growth, causing leaves to wilt and wither away. These microscopic pests feast on plant roots, creating unsightly knots in the root system. The key to preventing this problem lies in strategic crop rotation and selecting resistant cultivars. And if you already have an infestation on your hands? Solarize those soils to banish these unwanted guests for good!
Thrips
While thrips are capable of causing significant damage to leaves, their most insidious threat lies in their ability to transmit diseases. To mitigate this risk, consider incorporating reflective mulch into your garden design – its surface will help deter thrips from landing on your crops in the first place. Additionally, when planning your crop layout, be mindful of the fact that certain plants, such as cauliflower and onions or garlic, can have an adverse effect on one another.
By taking these precautions, you’ll be well on your way to creating a healthy and thriving garden.
Companion Planting for Cauliflower
Best Companions
When it comes to growing cauliflower, a few select companions can enhance its overall performance. Herbs such as rosemary, sage, dill, mint, and thyme seem to have a symbiotic relationship with this cruciferous vegetable, fostering healthy growth and development. Additionally, cauliflower also thrives when planted alongside certain fruits and vegetables like broccoli, Brussels sprouts, beets, cucumber, beans, celery, radish, corn, spinach, and chard.
Worst Companions
As you start to think about your garden’s layout, it’s essential to consider the varieties of vegetables that will thrive in different regions. A well-rounded harvest typically includes a mix of color and texture, as well as a range of growing conditions. Tomatoes, with their juicy flavor and versatility in cooking, are an excellent addition to any garden. Eggplants bring a pop of purple and can be used in everything from stir-fries to sandwiches.
Peppers come in a variety of colors and heat levels, making them perfect for adding spice to your meals. Potatoes are a staple crop that provide a starchy foundation for many recipes. Peas offer a burst of sweetness and freshness in the spring, while strawberries bring a sweet and luscious flavor to salads and desserts. Cabbage is a versatile brassica that can be used in slaws, soups, or as a side dish on its own.
Onions and garlic add pungent flavors and aromas to countless dishes, making them essential for any kitchen.
Harvesting & Storing Cauliflower
To gather cauliflower, you’ll need to cut off the main head at its base using a sharp, straight-edged knife. This marks the end of the plant’s productive cycle, as it will no longer produce new florets. When harvesting, I prioritize removing the larger heads first since they’re more likely to attract unwanted visitors like garden bunnies. If my pantry and fridge are well-stocked, I’ll spare the smallest heads for these furry critters once winter rolls around.
Storage
When harvesting cauliflower, aim to do so when needed, as this vegetable has a relatively short shelf life. In the fridge, it will typically remain fresh and edible for around a week. If you prefer, you can also freeze it in chunks for later use in soups and stews. However, I find that eating it fresh whenever possible is always the best option. Another great way to preserve cauliflower is through pickling. This not only extends its shelf life but also adds a tangy twist to various dishes.
Growing cauliflower can be a rewarding experience, especially if you’re new to gardening. Have you had any experience growing this veggie? Were there any specific challenges or tips that helped you succeed? We’d love to hear your stories and advice in the comments below!
